A Process Cycle represents a goal-setting process or a review process, or a survey. It can be designed or configured by selecting employees, reviewer groups, the workflow, etc.
The process cycle can regulate the scheduling and facilitate employee reviews more productively. The HR can track the cycle progress to ensure that the steps are completed within a given time frame.
- Add Cycle Details
- Add Employee List
- Confirm Cycle Setup
To initiate the process cycle
1st Step: Process Details
Pre-requisite: As a prerequisite, before setting up the cycle, ensure that the employee data is up to date — including new joiners and employees who have exited — and that the feedback form or template is available for all employees. |
1. Navigate to Admin > Most Popular Configurations > Process Cycles (Goal/Reviews)
2. To create a new process cycle, click Add Process Cycle.

3. In the Cycle Details tab, do the following.
Note: Here, the fields “Cycle Name”, “Review Form Type”, “Review Period”, and “Workflow” are mandatory. Do not skip these fields. |
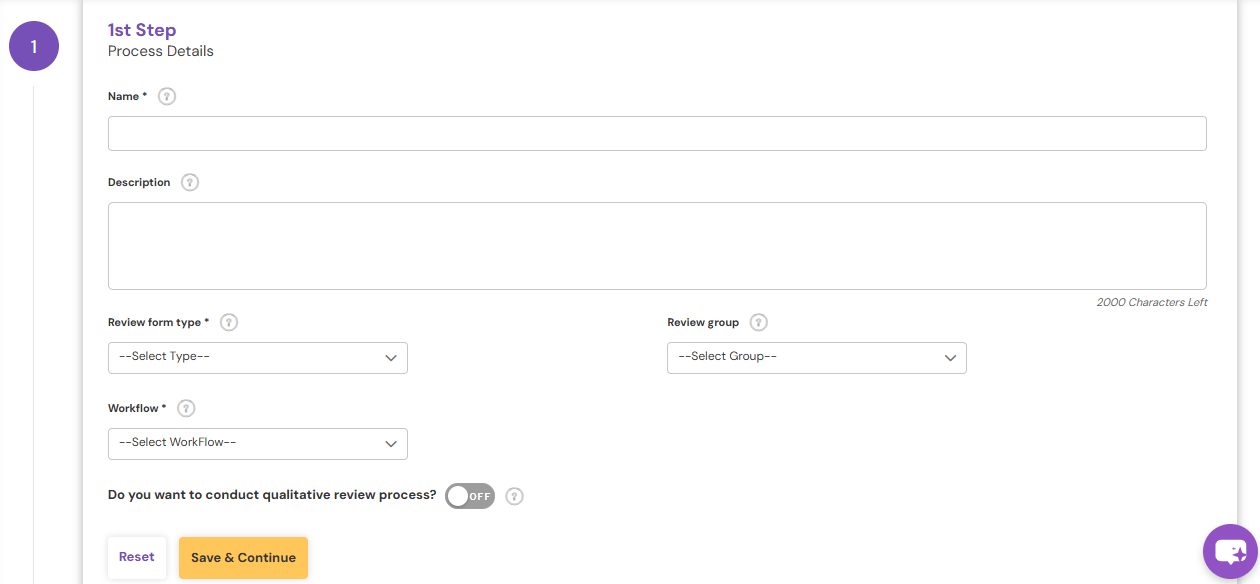
- Name - Enter a unique name for the cycle (for example: Annual Appraisal Cycle 2019, Quarter 1 Cycle 2019, or Appraisal Cycle FY 2018–2019).
The cycle name will appear in all employee feedback reports and in the respective employee’s performance details.
- Review form type - From the Template list, select the required review plan. The available review plan types include Performance Appraisal Plan (PAP), IDP, PIP, PRP, and Survey.
The Performance Appraisal Plan (PAP) is the primary process that ensures employees are evaluated based on their goal achievements and overall performance.
- Review group - Select the review group from the drop-down — this is the group that will carry out the employee reviews.
- Workflow - Select the respective workflow for the cycle.
- Review Period- Select the review period for which the goals are to be set or the assessment is to be done.
Note: If, for the new financial year, you are initiating a goal setting cycle, then kindly create a new Review Period. |

After entering all the details, click on save and continue.
2nd Step: Participants List
- To add employees to the cycle, click on Add participant

- The "Select employees by filter" option will allow you to add the employees basis the company, designation, location, etc.

- The "Select employee by name" filter option can be used to add employees by searching and selecting their names.
- Click on the select employee by name option and search for the name or number of the employee, and click on ADD.

- Employees will be added to the cycles.
Bulk addition of employees
- To add employees in a bulk manner to the process cycles, kindly choose the "Bulk Add/Remove Participants" option.

- Download the template and enter the employee number in the file, and save.


- Choose the file, once the validation is done, click on Add
- Employees will be added to the cycle.
Remove Employees from the cycle
- To remove employees from the process cycle, select the check box to the left of the employee number and click on the remove option to the right.

- After selecting remove you can enter the reason for removal and click remove.

- Employees will be removed from the cycle.
Bulk removal of employees
- To remove more employees from the process cycles, use the "Bulk Add/Remove Participants" option.

- Download the template, enter the employee number in the file, and the reason for removal, save the file and validate. Once the validation is completed, click "Remove".


Note: Employee Email ID is not mandatory |
- Employees will be removed from the cycle.
- The removed employee list can be viewed under the page highlighted below, and you may re-add the user from the same if required.

Re-add the removed user:
- Employees removed from the cycle can be re-added if required.
- To re-add, kindly navigate to the "Removed List" tab under the second step of the process cycle.

- Check the box towards the left of the respective employee number and "Add".
- The employee will be added back to the process cycle and tehy will continue with the steps they were pending at during the removal.
3rd Step: Confirmation
- Using Calendar, set the Cycle Dates (the Start and End date range for the beginning and ending of the cycle). This is the timeline for the assessment process.
- To start the cycle immediately, set the start date to the current date. If setting up the cycle for a future date, the timeline will be adjusted according.

Do you want to enable auto trigger of reminder notifications?
If you want the system to automatically send reminder emails to employees who have pending tasks, enabling the Auto Reminder Notification toggle will trigger reminders according to your planned schedule.
Note: Make sure to configure the due dates for each activity. (A due date is mandatory if you want the reminder emails to be sent automatically based on the configured frequency.) |

Send process kick-off email notification to confirmed employees?
If you want employees added to the cycle to receive a kick-off email notifying them about the initiation of the process, please enable this toggle before clicking the “Save & Confirm” button in Step 3.
Note: You can modify the start and end date of the cycle even in progress of the cycle in a case to extend the cycle when the reviewers and employees have not completed the feedback process within the timeline. |
Status of the Cycle:
HR can download the "Employee Feedback Status Report" to track the workflow progress of the employees in the Process cycle. To download the Employee Feedback Status Report, please follow the steps in the given article -Employee Feedback Status Report
PS: Synergita implementation for your Organization may vary from how the features are described here. The screenshots given here may also be different from what you see in your system. Please talk to the concerned person in the Organization for any specific queries.